Settings
Manage and customize your account settings.
Inventory Linking
Overview
The Inventory Linking feature lets you synchronise your platform's inventory with your sales channels. By selecting each sales channel, you can view and link corresponding items using our product search functionality, ensuring accurate order despatch and simplified stock management. This feature also provides insights on linked products, such as the percentage of successful links, and offers auto-linking based on SKU matches to reduce manual effort. Additionally, custom linking formulas enable you to define specific criteria for automatic linking, optimising your inventory management tasks.
This document provides detailed instructions on using these tools to achieve quick synchronisation across all sales channels.
Efficient inventory linking: Maximise the benefits of the inventory linking feature to synchronise your platform's inventory with your sales channels. By selecting each channel and using the inventory search, you can quickly pair and link corresponding items, ensuring effective stock management and synchronisation, thereby simplifying your inventory workflow.
Accessing the Inventory Linking Page
To access the inventory linking page, click on the settings icon on the left-hand side of the screen. Then, select the "Inventory Linking" option, as shown in the highlighted picture below.

Managing the Inventory Linking
You have various options to efficiently manage and control your process in the inventory linking management section. To learn how this feature works, please follow the steps below carefully:
- View Synchronisation and Select Channels
Begin by focusing on the top right field to view the current synchronisation rate, indicating how much of the inventory has been linked with the selected store. You can also choose between different sales channels and installed stores. This ensures that only the inventory related to the assigned sales channels is displayed, preventing any mixing up of data. - Utilise Linking Settings
Below, you'll find the linking settings section, where you can use powerful automation features:- Autolink on Perfect SKU Match: This option allows you to automate the matching SKUs for inventory linking when they are a 100% match.
- Linking Formulas: You can create custom linking formulas to define SKU patterns for automatic inventory matching.
- Create Custom Linking Formulas
To create a new formula, click the plus button next to "Linking Formulas," a popup window will appear, allowing you to define the filter using the following options. By utilising these filters, you can establish the necessary correspondence between the SKU codes from the sales channel and the SKUs in our platform, enabling the auto-match feature to function. Once you have created the desired formulas, click the "Confirm" button to save and activate the formula.
- Channel SKU: This is the SKU defined in the sales channel.
- Wild Card: This option matches any character.
- Text: Allows you to enter a custom text filter.
- Manage Linked and Unlinked Inventory
On the left side of the page, you will see all the unlinked inventory at the top and the linked inventory for the selected store and sales channel separately at the bottom. In the "Linked Products" section, you can review and manage all your currently linked inventory. Use the unlink button to unlink desired products. Once you have unlinked the selected entries, save your changes using the "Save Changes" button at the bottom right corner. The unlinked products will appear in the "Unlinked Products" section above, where you can pair them with new products based on your requirements. - Search and Pair Inventory Items
A product search popup window opens when you click the search button next to each inventory entry. This window allows you to search for and choose a product from your inventory. Once selected, the search button transforms into the unlink button, providing the option to unlink the product if you accidentally pick the wrong one or want to update the inventory match with a new item. After pairing up the desired inventory, save your changes using the "Save Changes" button at the bottom right corner of this section.
Automate with precision: Use the linking settings section to automate your inventory linking process. Activate features such as "Autolink on Perfect SKU Match" to save time. You can also create custom linking formulas to apply specific SKU filters for automatic inventory matching, allowing for greater inventory management flexibility.

Order Folders
Overview
The Order Folders allow you to create customisable folders with unique icons, colours, and names. This feature enables you to organise and assign orders to specific folders, enhancing your ability to filter and manage orders effectively. You can list orders by the folders they are assigned to, making it easier to locate and process them. Additionally, you can merge separate existing folders, combining their orders into a single folder without losing any data, further simplifying your order management workflow.
This document provides detailed instructions on creating and managing order folders.
Effective Order Folder Usage: Assign unique names, icons, and colours to your folders to enhance organisation and quick identification. Utilise the "Merge Folders" option to consolidate orders and improve your workflow.
Accessing the Order Folders Page
To access the order folders page, click on the settings icon on the left-hand side of the screen. Then, select the "Order Folders" option, as shown in the highlighted picture below.

Creating New Order Folders
To create a new folder, follow the steps below:
-
Click the "Create Folder" Button: From the bottom right corner of the page, click the "Create Folder" button.
-
Fill in the Details: In the popup window that opens, provide the following details and then click the "Create Folder" button in the popup window to finalise the process:
- Name: Assign the folder a unique and descriptive name. This will help you remember and understand its purpose when you assign orders to it later.
- Icon: Choose a unique icon for the folder from 30 available options. Icons help you quickly recognise folders.
- Colour: Assign a colour to the folder for recognition and identification. You can choose from 15 available colours.

Managing Order Folders
Data will be populated on the Order Folders page once you create and add orders to your folders. To learn how to manage your folders, follow the description below:
-
Fields Explained on the Order Folders Page:
- Folder Name: This column displays the names of the folders.
- Last Order Added: This column displays the date of the most recent order added to the folder. If you hover over it, you can view the full date with the hour, minutes, and seconds.
- Order Qty in Folder: This column displays the total number of orders added to the folders.
- Status: This column displays the status of the folder. If it’s "Active," the folder can be used. If it’s set to "Inactive," you won't be able to add any orders to this folder. You can change the status by clicking the status box of each folder.
- Actions: This button expands to display the actions you can take for each folder individually:
- Duplicate: This option creates a duplicate folder with its configuration. The status of a duplicated folder will be inactive, so if you plan on utilising it right away, remember to change its status to active.
- Delete: This option allows you to delete the folder.
-
Bulk Actions:
- You can also click the checkbox icon and select more than one folder to process them together using the bulk menu. The bulk menu actions are explained below:
- Duplicate: This option allows you to duplicate more than one folder at a time.
- Merge Folders: If you choose multiple folders, you can merge them. You will be prompted to set a new name, icon, and colour for the merged folder. Once the process is complete, the system will combine all the orders in the selected folders into one folder.
- Delete: You can delete multiple folders at a time using this option.
- You can also click the checkbox icon and select more than one folder to process them together using the bulk menu. The bulk menu actions are explained below:

Mail Account Settings
Overview
Setting up a mail account is crucial for making the most of the notifications and email templates. This account acts as the email gateway and ensures smooth and efficient communication when configured with API keys.
This document will guide you through setting up mail accounts and obtaining the credentials for your preferred email providers.
Accessing Mail Account Settings
Click on the settings icon at the bottom left-hand side of the screen, and then select the "Mail Account Settings" icon as highlighted.

Creating New Mail Accounts
To register a new mail account, follow these steps:
- Create Mail Account: Click the "Create Mail Account" button to set up a new one. This action will open a window where you can choose an email provider from the available options. Each provider listed will require you to enter an API key, except for the Despatch Cloud option.
- Choose Despatch Cloud: If you are unfamiliar with the various platforms and providers, Despatch Cloud is a convenient built-in email provider that eliminates the need to enter additional credentials. You can use Despatch Cloud for your email needs without other setup steps.
- Enter API Credentials: If you wish to continue with other options, you must enter their API credentials. Select one provider you currently or want to use, enter the credentials from the next page, and click the "Complete Setup" button to save your configuration. You can learn how to obtain these platforms' credentials at the bottom of this document.
- Test Settings: For providers that require API keys, the setup process includes an option to test the credentials. By selecting the "Test Settings" option, you can verify if the API keys you entered are functioning correctly. After clicking the "Test Settings" button, an email will be promptly sent to your inbox using the credentials you have just provided. This feature ensures your mail account is appropriately configured and ready to send emails.
Choose the Despatch Cloud option: If you are seeking a convenient and hassle-free setup, choose the Despatch Cloud option. This built-in provider eliminates the need for extra credentials, making it a simple choice.

Managing Existing Mail Accounts
All the details of the Mail Account Settings page are explained below:
- Fields Explained:
- Mail Provider: This is the email provider for the entry.
- Account Name: This is the name of the mail account you provided, as displayed on our system.
- Status: To manage your email accounts' availability and prevent confusion, you can activate or deactivate them as needed. This ensures that only active accounts are accessible in your notification settings. Simply click the "Active/Inactive" button to toggle the account's status.
- Notification Count: This column indicates the number of notifications associated with this email account.
- Actions:
- Trash Bin Icon: If you no longer require a specific mail account or want to remove unnecessary or outdated configurations, click the trash icon to delete it. A confirmation window will appear to ensure you are deleting the correct account. Once confirmed, the account will be deleted.
- Editing Existing Accounts: Each account is displayed as a separate entry, providing relevant details about its configuration. To change an existing mail account, click the displayed row to see the details. You will see the same window and information as when setting it up. In the opened window, you can make the necessary modifications to the API keys, which may involve entering new keys, removing existing ones, or updating them with the latest information provided by your email service provider. After making the desired changes to the API keys, save the updated information by clicking the "Save Changes" button.
Regularly update API keys: If your email service provider makes any changes or updates to your API keys, it's important to update them promptly. Keeping your API keys up to date ensures your mail account's continued functionality and reliability.

Obtaining API Credentials
Mailgun
- Step 1:
- To acquire the "Mailgun Domain" value, log in to your Mailgun account, and from the list of domains, select the one you intend to use.
- Copy and paste the corresponding domain address into the designated "Mailgun Domain" field.
- Step 2/4:
- For obtaining the "Mailgun API Key" and "Mailgun API Base URL" values, you have two options: you can either click on the desired domain, as indicated in the highlighted area, to navigate directly to the API key generation page or navigate through the left-hand bar by clicking the "Sending" tab and then proceed to the "Overview" page.
- Step 5:
- Locate and copy the API section on this page to provide the required credentials.
- Subsequently, paste these acquired values into their respective fields: "Mailgun API Key" and "Mailgun API Base URL".
If you are using a Sandbox, ensure the recipients are authorized in the Mailgun dashboard.

Amazon SES
To set up Amazon SES as your email provider, you must obtain the Region, Key, and Secret details. Follow these steps to complete the setup:
- Log into your AWS account and ensure the selected region aligns with your intended usage. You can do this by expanding the region menu located in the top right corner of the AWS console.
- Next, create an IAM (Identity and Access Management) user with the "AmazonSESFullAccess" policy. You can initiate this process by visiting the IAM User Creation link.
- Follow the steps outlined in the provided GIF or instructions on the page. After successfully creating the IAM user, click the "Download .csv" option and securely store the downloaded CSV file on your computer. This CSV file contains your Key and Secret credentials.

As the second step in setting up Amazon SES as your email provider, please follow these instructions:
- Go to the Amazon SES Dashboard page to initiate the "Create Identity" process, which authorizes a sender email or domain.
- You have two identity options on the SES Dashboard: verify an entire domain or a specific sender email address. After providing all the necessary information, click the "Create Identity" button at the bottom right corner of the page.
- After completing this step, you must validate the email address or domain. To do this, you must request production access from the SES Dashboard. To do this, click "Account dashboard" on the left-hand menu to navigate this page. You'll find the "Request production access" button at the top of this page. Click it to finalize the process.
- While on your dashboard, you can identify your AWS region in the dropdown menu. Interact with the button at the top right corner; the selected region will be highlighted in orange. For example, it might appear as "eu-west-2." You'll use this region information for the "Region" section.
- In the last section, you'll find an example of how to input your information. The "Name" field can be any label you prefer. Use the email address you used during the Amazon SES setup as the "Test Sender." Follow the region instructions mentioned above in the "Region" section. Retrieve the "Key" and "Secret" from the CSV file. You can test and save the connection after completing all these steps.

Brevo
To generate a new API key in Brevo, follow these steps:
- While logged into your account, click on your name at the top-right side of the screen.
- Click the "SMTP & API" button from the expanded user menu.
- Click the "API Keys" tab on the left side of the screen.
- In the "API Keys" tab, click the "Generate a new API key" button.
- Name your API key, then click the "Generate" button.
- Using the copy button, copy and save your API key.

Channel Logs
Overview
The Channel Logs page allows you to view the history of API calls made to the sales channels you have integrated with. You can filter and search for entries using various options, such as narrowing them by day and hour or filtering by their status: waiting, in progress, succeed, warning, failed, and info. Please refer to our dedicated documentation for detailed information on using the filters and search bar.
Accessing Channel Logs
To access the channel logs page, click on the settings icon on the left-hand side of the screen. Then, select the "Channel Logs" option, as shown in the highlighted picture below.

Managing Channel Logs
1. Data will be listed here as the system makes calls periodically or if you trigger API calls to sales channels with your actions. They are listed from the newest to the oldest. The columns are explained below:
- Date: Displays the full date and time for the API call.
- Status: The status of the call. Here are the definitions of all the available statuses:
- Waiting: The API call has been queued and is waiting to be processed.
- In Progress: The API call is currently being executed.
- Succeed: The API call was completed successfully without any issues.
- Warning: The API call was completed, but there were some warnings or non-critical issues.
- Failed: The API call was not completed due to errors.
- Info: General information related to the API call.
- Log Type: Describes the content of the API call.
- Message: The message displayed upon completing a call.
2. If you click any of the listed logs, you will be taken to the details of that particular log. Here, you can see the raw JSON response of the call with all the details. If you need to work on it, a copy button is provided to export the JSON response to your preferred text editor easily. On the right side of the details, you can see which user made the call, along with the request's IP address and user agent.

User Logs
Overview
The User Logs page allows you to view the history of user actions on your platform. Each action is assigned a unique ID, which can be copied and shared with our support team in case of an error. You can filter and search for entries using various options such as action type, IP address, user who performed the action, and date filters. Please refer to our dedicated documentation for detailed information on using the filters and search bar.
Accessing User Logs
To access the user logs page, click on the settings icon on the left-hand side of the screen. Then, select the "User Logs" option, as shown in the highlighted picture below.

Managing User Logs
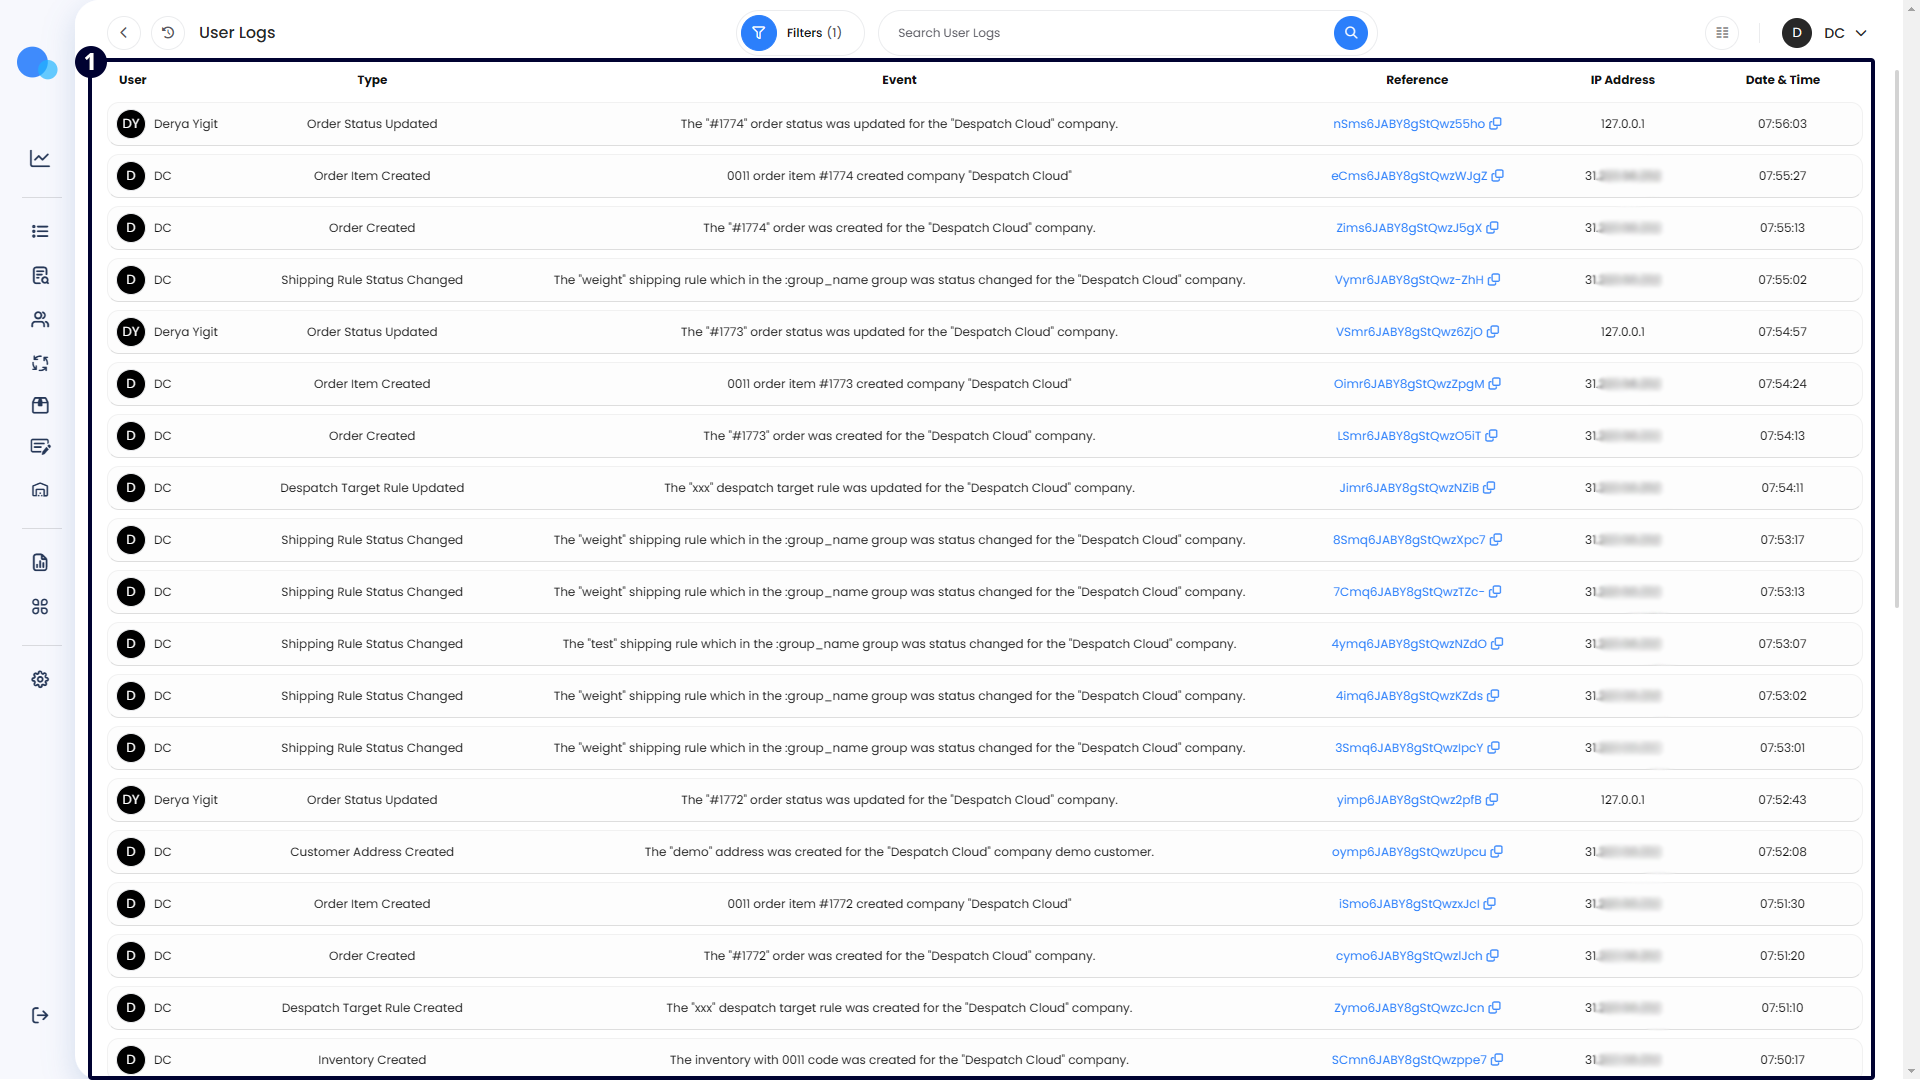
Data will be listed here as the users in your platform take action. They are listed from the newest to the oldest. The columns are explained below:
- User: The name of the user who took the action.
- Type: This explains the name of the action taken in a short way. The descriptions of each action type are as follows:
- Switched: The user changed from one account or profile to another.
- Unlinked: The user disconnected a linked account or integration.
- Transferred: The user moved data or ownership from one entity to another.
- Accepted Invitation: The user accepted an invitation to join a team or platform.
- Rejected Invitation: The user declined an invitation to join a team or platform.
- User Create: A new user account was created.
- User Update: An existing user account was updated.
- User Delete: A user account was deleted.
- User Status Change: The status of a user account was changed (e.g., activated or deactivated).
- Company Created: A new company profile was created.
- Company Info Updated: The information for a company profile was updated.
- Company Deleted: A company profile was deleted.
- Updated Access Time: The access time for a user or system was updated.
- Updated Currency Setting: The currency settings were updated.
- Removed Currency Setting: A currency setting was removed.
- Email Template Created: A new email template was created.
- Email Template Updated: An existing email template was updated.
- Email Template Deleted: An email template was deleted.
- Email Template Test Mail Sent: A test email was sent using an email template.
- Print Template Created: A new print template was created.
- Print Template Updated: An existing print template was updated.
- Print Template Duplicated: An existing print template was duplicated.
- Print Template Deleted: A print template was deleted.
- Courier API Request Log: Logged an API request to a courier service.
- Courier List: Retrieved a list of available couriers.
- Courier Async API Request Log: Logged an asynchronous API request to a courier service.
- Shipping API User Created: A new user for the shipping API was created.
- Get Preset List: Retrieved a list of shipping presets.
- Get Registration Field List: Retrieved a list of registration fields.
- Get Specifics Field List: Retrieved a list of specifics fields.
- Shipping Register Auth: Registered authentication for shipping.
- Shipping Update Auth: Updated authentication for shipping.
- Shipping Delete Auth: Deleted authentication for shipping.
- Shipping Create Shipment: Created a shipment.
- Shipping Bulk Create Shipment: Created multiple shipments in bulk.
- Shipping Create Manifest: Created a shipping manifest.
- Shipping Get Webhooks: Retrieved webhook settings for shipping.
- Shipping Cancel Label: Cancelled a shipping label.
- Shipping Regenerate Shipment File URL: Regenerated the file URL for a shipment.
- Label Format Changed: Changed the format of a shipping label.
- Add Courier Service: Added a new courier service.
- Get Courier Service: Retrieved details of a courier service.
- Update Presets: Updated shipping presets.
- Inventory Created: Created new inventory records.
- Inventory Deleted: Deleted inventory records.
- Inventory Archived: Archived inventory records.
- Inventory Restored: Restored archived inventory records.
- Barcode Created: Created a new barcode.
- Barcode Deleted: Deleted a barcode.
- Barcode Updated: Updated a barcode.
- Category Created: Created a new category.
- Category Updated: Updated an existing category.
- Category Deleted: Deleted a category.
- Inventory Tag Created: Created a new inventory tag.
- Inventory Tag Deleted: Deleted an inventory tag.
- Created Shelf: Created a new shelf for inventory storage.
- Deleted Shelf: Deleted an existing shelf.
- Updated Shelf: Updated an existing shelf.
- Created Warehouse: Created a new warehouse.
- Deleted Warehouse: Deleted an existing warehouse.
- Updated Warehouse: Updated an existing warehouse.
- Created Zone: Created a new zone within a warehouse.
- Deleted Zone: Deleted an existing zone.
- Updated Zone: Updated an existing zone.
- Created Location: Created a new location within a warehouse.
- Updated Location: Updated an existing location.
- Deleted Location: Deleted an existing location.
- Copied Location: Duplicated an existing location.
- Created Location Category: Created a new location category.
- Updated Location Category: Updated an existing location category.
- Deleted Location Category: Deleted an existing location category.
- Created Warehouse Contact: Added a new warehouse contact.
- Updated Warehouse Contact: Updated an existing warehouse contact.
- Deleted Warehouse Contact: Deleted a warehouse contact.
- Created Pick Routine: Created a new pick routine.
- Deleted Pick Routine: Deleted an existing pick routine.
- Updated Pick Routine: Updated an existing pick routine.
- Created Pick Routine Template: Created a new pick routine template.
- Deleted Pick Routine Template: Deleted an existing pick routine template.
- Updated Pick Routine Template: Updated an existing pick routine template.
- Re-Sorted Pick Routine Template: Re-sorted a pick routine template.
- Pick Created: Created a new pick list.
- Pick Updated: Updated an existing pick list.
- Pick Deleted: Deleted a pick list.
- Pick Archived: Archived a pick list.
- Pick Item Picked Quantity Updated: Updated the picked quantity for an item in a pick list.
- Pick Item Action Quantity Updated: Updated the action quantity for an item in a pick list.
- Pick Item Action Quantity Removed: Removed the action quantity for an item in a pick list.
- Pick Item Skipped: Marked an item in a pick list as skipped.
- Pick Item Location Changed: Changed the location of an item in a pick list.
- Pick Item Deleted: Deleted an item from a pick list.
- Pick Item Split: Split an item in a pick list into multiple parts.
- Pick Tag Created: Created a new tag for a pick list.
- Pick Tag Deleted: Deleted a tag from a pick list.
- Customer Created: Created a new customer profile.
- Customer Updated: Updated an existing customer profile.
- Customer Deleted: Deleted a customer profile.
- Customer Archived: Archived a customer profile.
- Customer Contact Created: Created a new customer contact.
- Customer Contact Updated: Updated an existing customer contact.
- Customer Contact Deleted: Deleted a customer contact.
- Customer Contact Archived: Archived a customer contact.
- Customer Address Created: Added a new customer address.
- Customer Address Updated: Updated an existing customer address.
- Customer Address Deleted: Deleted a customer address.
- Customer Address Archived: Archived a customer address.
- Customer Tag Created: Created a new customer tag.
- Customer Tag Deleted: Deleted a customer tag.
- Customer Note Created: Added a new note to a customer profile.
- Customer Note Deleted: Deleted a note from a customer profile.
- Order Tag Created: Added a new tag to an order.
- Order Tag Deleted: Deleted a tag from an order.
- Order Created: Created a new order.
- Order Updated: Updated an existing order.
- Order Folder Created: Created a new order folder.
- Order Folder Updated: Updated an existing order folder.
- Order Folder Deleted: Deleted an order folder.
- Order Folder Copied: Duplicated an order folder.
- Order Folder Merged: Merged two or more order folders.
- Order Folder Tag Created: Added a new tag to an order folder.
- Order Folder Tag Updated: Updated an existing tag on an order folder.
- Order Folder Tag Deleted: Deleted a tag from an order folder.
- Order Status Updated: Updated the status of an order.
- Order Deleted: Deleted an order.
- Order Archived: Archived an order.
- Order Unarchived: Unarchived an order.
- Order Item Created: Added a new item to an order.
- Order Item Updated: Updated an existing item in an order.
- Order Item Deleted: Deleted an item from an order.
- Order Comment Created: Added a new comment to an order.
- Order Comment Updated: Updated an existing comment on an order.
- Order Comment Deleted: Deleted a comment from an order.
- Order Attachment Created: Added a new attachment to an order.
- Order Attachment Deleted: Deleted an attachment from an order.
- Notification Created: Created a new notification.
- Notification Updated: Updated an existing notification.
- Notification Deleted: Deleted a notification.
- Notification Status Changed: Changed the status of a notification.
- Notification Re-Send: Resent a notification.
- Mail Account Setting Created: Created a new mail account setting.
- Mail Account Setting Updated: Updated an existing mail account setting.
- Mail Account Setting Deleted: Deleted a mail account setting.
- Mail Account Setting Status Changed: Changed the status of a mail account setting.
- Log: An entry of a log action.
- Store Created: Created a new store.
- Store Updated: Updated an existing store.
- Store Deleted: Deleted a store.
- Store Address Updated: Updated the address of a store.
- Channel Created: Created a new sales channel.
- Channel Updated: Updated an existing sales channel.
- Channel Deleted: Deleted a sales channel.
- Shipping Rule Configuration Created: Created a new shipping rule configuration.
- Shipping Rule Configuration Updated: Updated an existing shipping rule configuration.
- Shipping Rule Group Created: Created a new shipping rule group.
- Shipping Rule Group Updated: Updated an existing shipping rule group.
- Shipping Rule Group Deleted: Deleted a shipping rule group.
- Shipping Rule Group Status Changed: Changed the status of a shipping rule group.
- Shipping Rule Group Sorted: Sorted a shipping rule group.
- Shipping Rule Group Duplicated: Duplicated a shipping rule group.
- Shipping Rule Created: Created a new shipping rule.
- Shipping Rule Updated: Updated an existing shipping rule.
- Shipping Rule Deleted: Deleted a shipping rule.
- Shipping Rule Status Changed: Changed the status of a shipping rule.
- Shipping Rule Sorted: Sorted a shipping rule.
- Tax Group Created: Created a new tax group.
- Tax Group Updated: Updated an existing tax group.
- Tax Group Deleted: Deleted a tax group.
- Tax Group Status Changed: Changed the status of a tax group.
- System Default Created: Created a new system default.
- System Default Updated: Updated an existing system default.
- System Default Deleted: Deleted a system default.
- Shipment Package Template Created: Created a new shipment package template.
- Shipment Package Template Updated: Updated an existing shipment package template.
- Shipment Package Template Deleted: Deleted a shipment package template.
- Shipment Package Template Duplicated: Duplicated a shipment package template.
- Inventory Linking Attached: Attached an inventory linking.
- Inventory Linking Detached: Detached an inventory linking.
- Rule Engine Created: Created a new rule engine.
- Rule Engine Updated: Updated an existing rule engine.
- Rule Engine Deleted: Deleted a rule engine.
- Rule Engine Status Changed: Changed the status of a rule engine.
- Rule Engine Sorted: Sorted a rule engine.
- Rule Engine Duplicated: Duplicated a rule engine.
- Rule Engine Ran: Ran a rule engine.
- Rule Engine Tested: Tested a rule engine.
- File Uploaded: Uploaded a file.
- Job Retry: Retried a job.
- Job Cancelled: Cancelled a job.
- Printing Queue Created: Created a new printing queue.
- Printing Queue Status Changed: Changed the status of a printing queue.
- Printing Queue Retried: Retried a printing queue.
- Supplier Created: Created a new supplier profile.
- Supplier Updated: Updated an existing supplier profile.
- Supplier Deleted: Deleted a supplier profile.
- Supplier Archived: Archived a supplier profile.
- Supplier Contact Created: Created a new supplier contact.
- Supplier Contact Updated: Updated an existing supplier contact.
- Supplier Contact Deleted: Deleted a supplier contact.
- Supplier Contact Archived: Archived a supplier contact.
- Supplier Address Created: Created a new supplier address.
- Supplier Address Updated: Updated an existing supplier address.
- Supplier Address Deleted: Deleted a supplier address.
- Supplier Address Archived: Archived a supplier address.
- Supplier Tag Created: Created a new supplier tag.
- Supplier Tag Updated: Updated an existing supplier tag.
- Supplier Tag Deleted: Deleted a supplier tag.
- Supplier Tag Archived: Archived a supplier tag.
- Supplier Note Created: Created a new note for a supplier profile.
- Supplier Note Deleted: Deleted a note from a supplier profile.
- Delivery Created: Created a new delivery record.
- Delivery Updated: Updated an existing delivery record.
- Delivery Deleted: Deleted a delivery record.
- Delivery Archived: Archived a delivery record.
- Delivery Unarchived: Unarchived a delivery record.
- Delivery Published: Published a delivery record.
- Delivery Item Created: Added a new item to a delivery record.
- Delivery Item Deleted: Deleted an item from a delivery record.
- Delivery Item Location Updated: Updated the location of an item in a delivery record.
- Delivery Item Action Qty Updated: Updated the action quantity for an item in a delivery record.
- Delivery Size Created: Created a new delivery size.
- Delivery Size Updated: Updated an existing delivery size.
- Delivery Size Deleted: Deleted a delivery size.
- Delivery Assigned User Created: Assigned a user to a delivery record.
- Delivery User Time Tracking Started: Started time tracking for a user on a delivery record.
- Delivery User Time Tracking Stopped: Stopped time tracking for a user on a delivery record.
- Delivery Attachment Created: Added a new attachment to a delivery record.
- Delivery Attachment Updated: Updated an existing attachment on a delivery record.
- Delivery Attachment Deleted: Deleted an attachment from a delivery record.
- Delivery Tag Created: Created a new tag for a delivery record.
- Delivery Tag Deleted: Deleted a tag from a delivery record.
- Delivery Expected Date Updated: Updated the expected date for a delivery record.
- Despatch Target Rule Created: Created a new despatch target rule.
- Despatch Target Rule Updated: Updated an existing despatch target rule.
- Despatch Target Rule Deleted: Deleted a despatch target rule.
- Despatch Target Rule Sorted: Sorted a despatch target rule.
- Despatch Target Rule Duplicated: Duplicated a despatch target rule.
- Despatch Target Rule Status Changed: Changed the status of a despatch target rule.
- Despatch Target Rule Ran: Ran a despatch target rule.
- Global System Notification Snoozed: Snoozed a global system notification.
- Document Rule Created: Created a new document rule.
- Document Rule Updated: Updated an existing document rule.
- Document Rule Deleted: Deleted a document rule.
- Document Rule Status Changed: Changed the status of a document rule.
- Document Rule Sorted: Sorted a document rule.
- Document Rule Duplicated: Duplicated a document rule.
- Document Rule Ran: Ran a document rule.
- Supplier Purchasing Settings Updated: Updated purchasing settings for a supplier.
- Customer Merged: Merged customer profiles.
- Purchase Order Created: Created a new purchase order.
- Purchase Order Duplicated: Duplicated an existing purchase order.
- Purchase Order Canceled: Canceled a purchase order.
- Purchase Order Sent to Supplier: Sent a purchase order to a supplier.
- Purchase Order Drafted: Drafted a purchase order.
- Purchase Order Deleted: Deleted a purchase order.
- Purchase Order Paid Amount Updated: Updated the paid amount for a purchase order.
- Purchase Order Total Amount Updated: Updated the total amount for a purchase order.
- Purchase Order Archived: Archived a purchase order.
- Purchase Order Address Updated: Updated the address on a purchase order.
- Purchase Order Tag Created: Created a new tag for a purchase order.
- Purchase Order Tag Deleted: Deleted a tag from a purchase order.
- Purchase Order Item Created: Added a new item to a purchase order.
- Purchase Order Updated: Updated an existing purchase order.
- Purchase Order Item Deleted: Deleted an item from a purchase order.
- Report Created: Created a new report.
- Report Updated: Updated an existing report.
- Report Deleted: Deleted a report.
- Report Exported: Exported a report.
- Channel Print Template Updated: Updated a print template for a channel.
- Rule Engine Conditions Saved: Saved conditions for a rule engine.
- Rule Engine Conditions Deleted: Deleted conditions for a rule engine.
- Rule Engine Conditions Restored: Restored conditions for a rule engine.
- Despatch Target Rule Conditions Saved: Saved conditions for a despatch target rule.
- Despatch Target Rule Conditions Deleted: Deleted conditions for a despatch target rule.
- Despatch Target Rule Conditions Restored: Restored conditions for a despatch target rule.
- Document Rule Conditions Saved: Saved conditions for a document rule.
- Document Rule Conditions Deleted: Deleted conditions for a document rule.
- Document Rule Conditions Restored: Restored conditions for a document rule.
- Shipping Engine Conditions Saved: Saved conditions for a shipping engine.
- Shipping Engine Conditions Deleted: Deleted conditions for a shipping engine.
- Shipping Engine Conditions Restored: Restored conditions for a shipping engine.
- Notification Conditions Saved: Saved conditions for a notification.
- Notification Conditions Deleted: Deleted conditions for a notification.
- Notification Conditions Restored: Restored conditions for a notification.
- Event: This column provides detailed information about the action taken.
- Reference: The system assigns unique IDs to each action. Clicking on the reference IDs copies them, which helps report issues with logged actions to support.
- IP Address: This shows the IP address of the user who performed the action.
- Date & Time: Displays the date and time when the action was taken.
Tax Group Settings
Overview
This page provides a comprehensive solution for managing tax rates accurately and efficiently. Using tax groups, you can establish specific tax rates for different jurisdictions, such as countries, states, and cities. This level of detail enables precise tax calculations customized for each jurisdiction.
Once you've defined the tax rates within a tax group, you can manually assign that tax group to your products in the inventory or visit the "System Defaults" page and select the tax group to apply to all inventory automatically. The applicable tax rate is automatically applied to the order total when these products are added to an order. This ensures that the correct taxes are included in the final sum, facilitating accurate tax compliance and reducing manual effort.
Efficient Tax Application for Products: Assign tax groups to your products in the inventory. When these products are included in an order, the corresponding tax rate is automatically applied, eliminating the need for manual calculations and reducing errors.
Accessing the Tax Group Settings Page
Click on the settings icon on the left-hand side of the screen. Then, select the "Tax Group Settings" icon, as highlighted below.

Creating a New Tax Group
Follow these steps to define tax rates for specific countries and regions:
-
Create a Tax Group: Locate and click the "Create Tax Group" button at the bottom right of the screen.
-
Name and Status: On the tax group creation page, provide a name for your tax group in the "Tax Group Name" text box on the right side of the page. You can also set the status of the tax group by toggling the switch between "Inactive" and "Active." Disabling a tax group ensures it is unavailable for use while retaining its configuration. You can delete a tax group using the "Delete Group" button, which becomes accessible after saving the tax group.
-
Country of Origin: On the left side of the screen, start by selecting the "Country of Origin" from the dropdown menu.
-
Region Selection: Select the corresponding region from the dropdown menu once you've chosen a country. A "Select All" button is available above the checkboxes to include all regions if you do not want or need to configure each region separately for the country of origin you chose.
-
Set Tax Rate: After selecting the desired country and region, enter a percentage in the "Tax Rate" text box to set the tax rate.
-
Add Additional Regions: To add more countries and regions to the tax group, click the plus button above the tax rate box, and a new entry will appear below the existing one.
-
Remove Entries: Every tax group must have at least one entry. When two or more are present, the trash bin icon becomes available to remove entries. If you've accidentally added a new one or want to remove a previously configured tax group entry, you can use the trash bin icon to delete it.
-
Save Changes: After configuring your tax group, click the "Save Changes" button to save your settings and create the new tax group.
Expanding Tax Groups for Multiple Regions: To include additional countries and regions in a tax group, click the plus button to create more entries. Ensure each tax group has at least one entry, and use the trash bin icon to remove entries as needed.

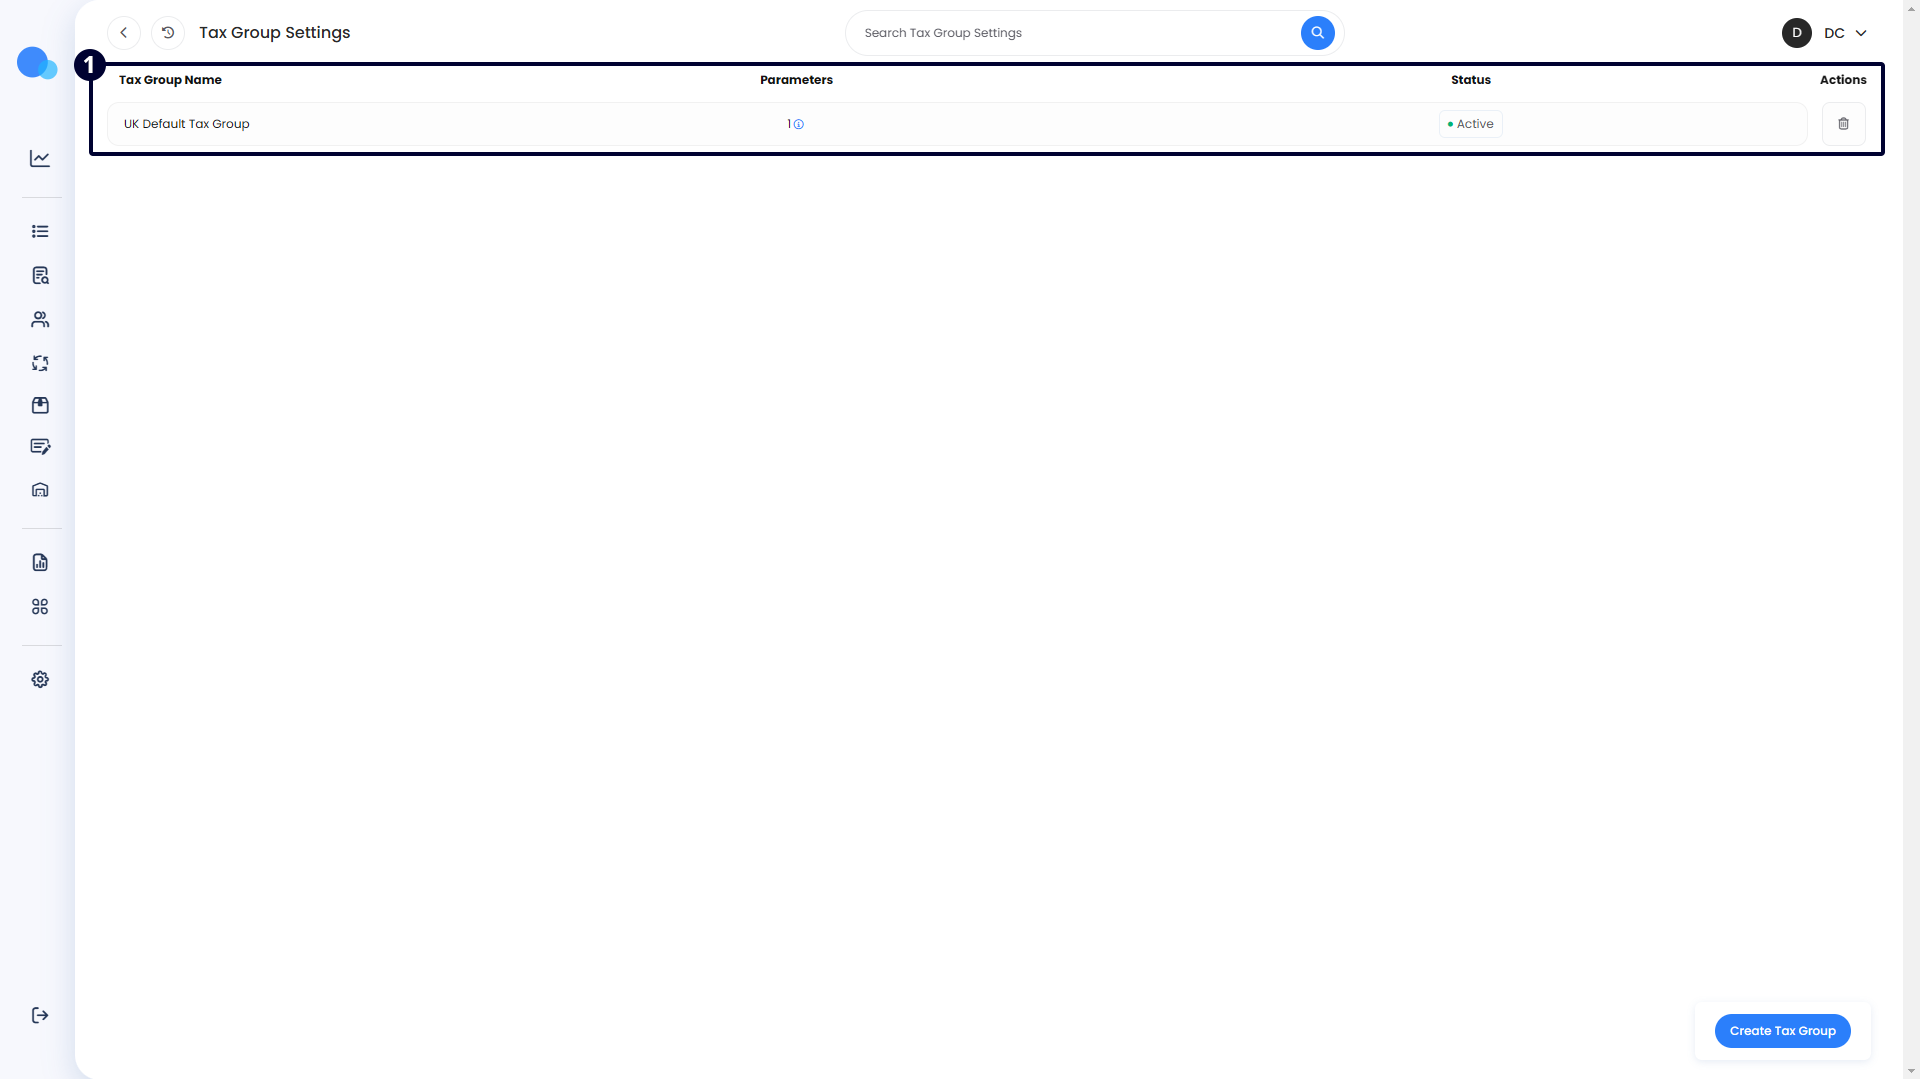
Managing Existing Tax Groups
-
Tax Group Name: This column displays the name you assigned to the tax group during setup. It helps identify the tax group.
-
Parameters: This column shows the number of countries and entries included in the tax group. Hover over the number to view a detailed list of all the countries, regions, and their respective tax rates.
-
Status: This column indicates the current status of the tax group, either "Active" or "Inactive." Clicking the button in this column will toggle the status. Disabling a tax group makes it unavailable for use while retaining its configuration.
-
Actions: The trash bin icon in this column allows you to delete the tax group. However, if the tax group is assigned to any inventory or set as the default tax group in the "System Defaults" page, you cannot delete it until you remove these assignments.
Clicking on an entry will allow you to view and edit the details, returning you to the same page view as when you initially created the tax group.
Quickly Review Tax Details: Hover over the number in the "Parameters" column to view a detailed list of all countries, regions, and their respective tax rates within the tax group. This feature helps ensure that all settings are correctly configured without the need to open each entry.